A $6 DIY ceiling fan makeover: Before and after
Being a homeowner is expensive.
Correction: Being a homeowner who wants to tear out and replace everything in the house is expensive.
But my home is also my hobby. It’s one of those expenses that falls into the “needs list” (shelter)and the “wants list” (my complete kitchen remodel). Living in aesthetically pleasing surroundings puts me at ease almost as much as a really mean massage, the kind where they throw elbows.
So, possibly you don’t identify with that. Possibly you totally understand where I’m coming from. Either way, I had a situation, and I needed a frugal solution.
Here’s the deal: My three ceiling fans were ugly as all get-out. And I had to look at one of them every morning when I woke up and every evening before I fell asleep — and all day long while I worked.
But I didn’t want to buy three new fans. For one thing, the fans I have are made by a good brand and they work well. They’re also in great condition. So I certainly didn’t want to replace three perfectly functional fans with cheaper models.
But I also didn’t want to spend the money on three high-quality fans purely for aesthetic reasons. For instance, I liked this fan from Restoration Hardware, but it was $329. So let’s do the math:
3 fans x $329 per fan = Not gonna happen!
I have a long list of house projects that I’d rather spend that money on, and ceiling fans aren’t at the top of that list. So I continued to glare at these fans, trying to figure out what to do with them. Leave them alone and just replace the fans later? Give them an Extreme Fan Makeover?
I decided that they couldn’t look any worse, so a makeover it was.
The plan
Using the Restoration Hardware fan as a guide, I came up with a game plan to transform my ceiling fans.
I saw that the blades were lighter on the other side, so one thing I wanted to do was flip them to the lighter side. Then, to address the lights, I found a low-profile ceiling fan light kit at Lowe’s for $50, and paid for it with a Christmas gift card. (Thanks, Aunt Susan!) By the way, I recently saw simple light kits for as low as $20. Then I bought a can of Valspar Metallic spray paint ($6), and I was ready to get started.
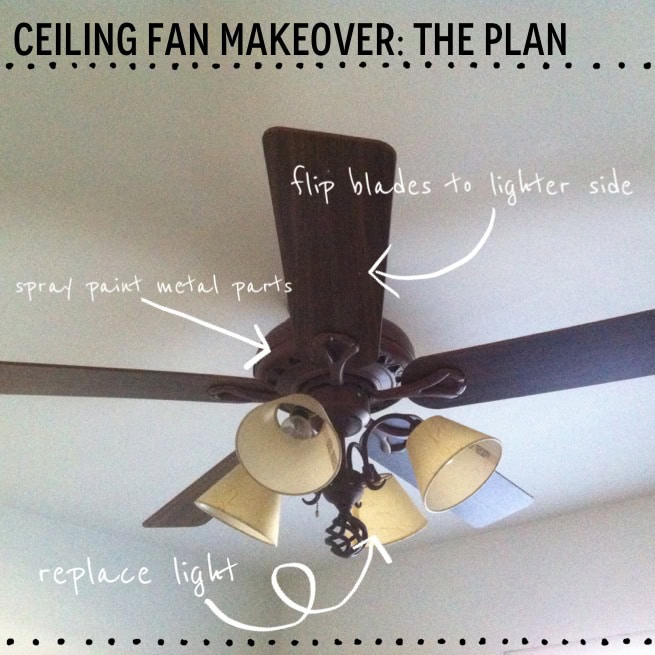
(Note: I forgot to take a “before” picture of the ceiling fan I worked on, but since I have three of these bad boys, I snapped a pic of one of the other fans.)
How to give your ceiling fan an overhaul
If you’re interested in doing something similar, here’s how I executed the plan.
First, I cut the electricity to the master bedroom, cause I really didn’t want to end up like this guy. The expert at Lowe’s said, “Turn the electricity off at the fuse box, check to make sure it’s off with a voltage tester, and flip the wall switch in the room to the off position. If in doubt, you can always hire an electrician.”
Next, I got a ladder and a husband. It doesn’t have to be a husband, but it helps to have a second pair of hands. Fans aren’t all that heavy, but they are unwieldy. Another tip from Lowe’s Fan Expert Guy: “If you can, remove the fan blades before taking down the fan unit and put them back on after reinstalling it. It makes it a lot easier to handle the fan.” Unfortunately, that wasn’t possible for us, so while my husband unscrewed the screws (I couldn’t reach!), I held onto the fan.
Although the fan base was no longer attached to the ceiling, the wires were still attached. So we disconnected those, being careful to not let the fan hang by the wires.
Then we took the fan into the garage and started figuring out how to take the entire thing apart. First, we removed the old light kit and set it aside. From there, we continued taking the fan apart until it was in a whole bunch of pieces. Don’t be intimidated by my handyman jargon, guys. The inside of the fan was full of dust (gross!) so we cleaned every piece and took the metal parts outside. I also opened the new light kit and took the metal rim outside.
Spray painting a ceiling fan
We placed all of the metal parts on a large piece of cardboard, and I used painter’s tape and an old t-shirt to wrap parts like the motor and wires — things that should not be painted.
Then I spray-painted the metal pieces with two thin and even coats of Valspar Metallic in Brushed Nickel.

After the pieces were dry, we brought them back into the garage. We started to reassemble the fan, with the lighter side of the blades facing down and with the new light kit.
Then we carried the fan back into the master bedroom, and I held it up while my taller half locked it in place, hooked up the wires, and put the screws back in.
Then it was the moment of truth. We flipped the breaker, flipped the light switch, and violÃ! We had light, we had a fan. Thank goodness, too, because if it didn’t work, we probably would’ve had to take the stupid thing down again!
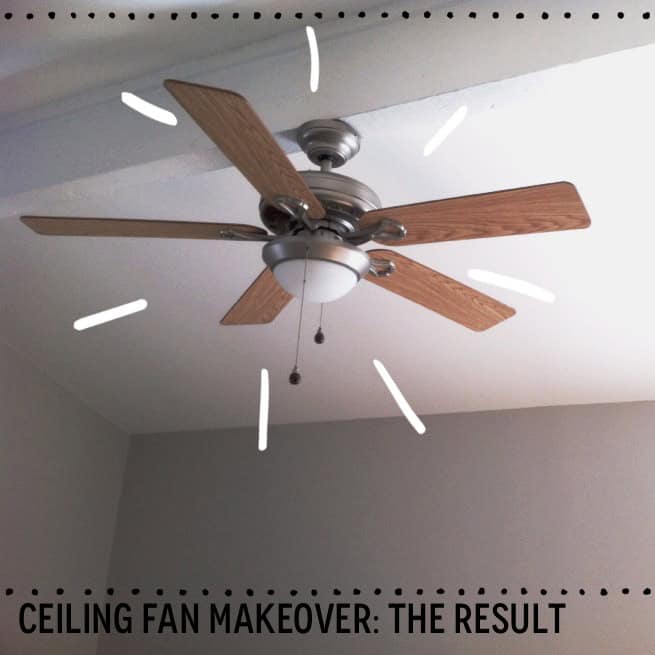
Being the interior design weirdo that I am, I’m still staring at my ceiling fan, but now it’s because I love it. I’m also especially happy that I was able to “upcycle” our fans, rather than throwing them in the dump and shelling out hundreds of dollars for new ones.
Renovating my house and doing these sorts of projects reminds me of the part in the documentary Helvetica when graphic designer Michael Bierut says, “…there was a time when it just felt so good to take something that was old and dusty and homemade and crappy looking and replace it with Helvetica. It just must have felt like you were scraping the crud off of filthy old things and kind of restoring them to shining beauty.” And all for $6 and one afternoon of time, I might add. (Ugh. Now I’ve also given myself away as both a typography and a documentary nerd.)
At any rate, obviously, I’ll be repeating this process with the other two fans. And I’ve got a few more house projects in the works, so let me know if you’d like to see more DIY ideas here at Get Rich Slowly!
Finally, I’d love to hear from you.What’s your favorite frugal home makeover project? Tell us about it in the comments!

Become A Money Boss And Join 15,000 Others
Subscribe to the GRS Insider (FREE) and we’ll give you a copy of the Money Boss Manifesto (also FREE)

There are 52 comments to "A $6 DIY ceiling fan makeover: Before and after".
What a huge difference the light kit made! Great job! The easiest home dec improvement I’ve ever made was replacing ugly brass cabinet pulls in the kitchen with floral ceramic ones. Again, huge difference. We replaced one cabinet when we bought the house because the kitchen had a total of one drawer! I saved that new cabinet when we did the kitchen renovation 7 years later and still use it for craft storage.
It’s nice when needs, wants, and hobbies overlap. For me, it wouldn’t be worth the time and effort to make the change, but if home renos were something I truly enjoyed doing, I can imagine how it’d be a fallry low cost, fun, and practical project.
Looks great! This is something that I keep telling W that we need to do. We have five fans in our house and they all need to be redone because they are super old and bad looking.
I thought that when you flip fan blades over it blows the air in the opposite direction? Ie heard people do this in the summer / winter to save on heating bills.
That is what happens when you flip the switch on the unit to have the blades turn in the opposite direction. Flipping the blades over just makes the opposite surface visible.
Yeah, that was my immediate thought too, having studied fluid dynamics (i.e. physics of wings!), I cringed here.
For a standard fan, you don’t flip the blades, you can change the rotation of the fan. In summer it rotates one way and the blades draw hot air up. In winter the blades rotate the other way and push air down. Wings work by having a different profile on the top and bottom. Air moves quicker over the top of the blade, decreasing pressure relative to the underside of the wing and causing lift. So will these flipped blades work? I’m not sure if fan blades actually have these aerodynamic profiles or not. Maybe fan blades are straight edged and only work with a sail effect?
April, does this mean you have to change the rotation of your fan now?
Marcy,
The typical blades on a ceiling fan have no aerodynamic profile – they are simply flat blades, ‘pushing’ the air around as they cut through it.
In summer, the fan should be pushing air directly down to create air movement in the room (cooling via evaporation at a person’s skin). In winter, by reversing the rotation of the fan, hotter air which has risen to the ceiling is pushed down the room’s walls to help keep the room warmer at ground level (hopefully without any drafts!).
I’m inspired! We have a particularly ugly ceiling fan in our new place and the one I really like is over $500 http://www.houzz.com/photos/modern/ceiling-fans
This is something that I want to try – though I’ll probably need to buy a new ladder because of the 18′ lofted ceiling.
See if you can borrow a tall ladder from a neighbor. And agree to swap the use of something you have that they don’t.
I have seen it strongly advised that you should not try painting the blades, though, because they must be precisely balanced and it is very hard to paint precisely.
When we were painting our entryway (with 16′ ceilings) we were able to rent a scaffolding ladder for $25 per day. MUCH cheaper than buy a large ladder that you then have to store!
When we were painting our entryway (with 16′ ceilings) we were able to rent a scaffolding ladder for $25 per day.
MUCH cheaper than buying a large ladder that you then have to store!
I repainted my kitchen cabinets instead of replacing them. New knobs and I had a new kitchen.
I love those little changes that can make a huge difference without breaking the budget! So yes, please continue sharing stories like this on GRS.
Nice job! It’s also worth noting that most fans can have a light added on even if they don’t have a light on them already. That’s what we did with several fans that didn’t have lights on them to start. The cheap ones run about $25 at Lowes and make a big difference.
I am sure you read Young House Love if you are into this stuff, but if you don’t, you should! What a great blog.
I imagine you could have painted the fan blades too, if you wanted? (Depending on what your decor was throughout.)
I did something very similar with the fan in my kitchen. Only since I don’t have the husband, and the ceiling is vaulted, I hand painted it instead of spray painting so I wouldn’t have to take it down. A new light kit and new globes, and it was like a brand new fixture! It’s amazing what a difference small changes make!
I have this same issue in my house right now but the blades have a lovely mesh/wicker center in them so it isn’t possible to turn them over. I would love to redo them rather than buy new ones. I’ll have to look around and see if I can buy new blades so I too can sleep at night without having to wake up to ugliness. I’m all about being frugal and stylish so I loved this post.
Is the entire middle mesh/wicker? Mine has a horribly ugly mesh/wicker inset – and it’s falling off – I am going to expolore fliping the blades!
Awesome job! What a transformation! Yes, please show us other DIY projects. It might be what some of us need to get motivated. Right now with all of the snow & sub-zero temperatures, I just want to hibernate – but Spring is coming and I’m sure that will inspire me to take on some projects.
//We flipped the breaker, flipped the light switch, and violà !//
[pedant]
The viola is a string instrument in the violin family. The word you’re looking for is “voila!”
[/pedant]
I hope you covered up the breathing holes in the motor before painting it. Paint on the windings probably isn’t good for the motor.
Ha! As a pedant who played viola in grade school, I thank you. 😀
Also watched “Helvetica”, but admit to falling asleep almost immediately. DH (computer programmer nerd) watched the whole thing and talked about it for days! Happily, my bedroom fans look exactly like your “After” picture! ;->
Your post was right on time for me. I just bought a new (to me) home and my office has a ceiling fan with a light kit that does not offer enough light in the evenng and at night. It will have to be replaced soon with a new light kit that gives more light. At present, I can hardly see the key board in the late evenings.
I may not go for the full make over, but it is encouraging to know that it is something that can be done later if I decide to go that route. Thank you for showing us how inexpensively it can be done.
Keep up the good work and, yes, I’d like to see more articles like this.
You sound exactly like me! My house is my hobby also. We have a mobile home and in the 23 yrs. we have lived here we have redone (as in remove walls, tape, texture, paint, wood flooring etc.) just about every room. Only the bathrooms are left. I also have a ceiling fan in the living room that I hate but the one I want is over $500!! I just can’t bring myself to buy it no matter how much I love it. I’m so glad I saw this because now I know what to do with the one I have!
Loved this post! I am in the exact same situation – my home is my refuge and I have more ideas than money. Would love to see more posts like this.
Super cool April. Looks amazing. I’d love to see more DIY posts like this!
I have a couple of fans I want to do but the finish is shiny brass. I don’t know that I can paint shiny brass–any one have any ideas?
If you sand the surface to make it less shiny, you should be able to spray paint them with a new color.
This isn’t exactly a home makeover, but I’ve flexed my sewing skills by making my own throw pillow cases. It’s incredibly easy, and you just stuff them with old pillows. My mom has made her own curtains, which is great, because curtain panels are kinda expensive.
I’m impressed with the fan makeover! I’m not great with big projects. We recently attempted to make our own cat condo out of an old mini bookshelf and some leftover sisal rug. It was…interesting. Haha.
But yes-despite my own lack of skills, I enjoy DIY posts. And I really enjoy April posts, so I’d definitely like to see more of your projects 🙂
We have three ceiling fans in our house, but I’d be hard pressed to tell you what they look like – I NEVER look at them. 🙂
The makeover we’re working on now is kitchen lighting. The previous owners put in fluorescents – beyond ugly!!! – and also put them in wrong, so when the bulbs started to go we couldn’t just take them out and replace them. The whole fixtures have to come out (yay), but there is no quick and easy fix for replacing four enormous fixtures.
Great post! We’ve been doing a lot of little fixes around our house to make it function better without spending a lot. One of our recent projects was to upgrade our thermostat to a smart thermostat. It’s helped us to regulate/monitor our energy usage and adjust as needed, saving us money in the end.
http://www.rathersquare.com/2013/12/tale-of-three-thermostats/
I like DIY articles. They are inspiring. Sure, we can talk PF theory, and how it’s cheaper to do this or that (all theory), but nothing like a good demonstration to show ideas in action. Even if you’re not going to exactly fix a fan, this makes you think about other things you can do.
Plus, April is a fun writer, so there’s that.
How about an automotive article? April changes her car oil! Yes??
Let’s be careful out there folks.
Any time electrical wiring is involved, you can put it together wrong in ways you won’t notice until it is a serious problem. Electrical wiring is not a hobby. (Improperly stripping the wires, incorrectly connecting the wire nuts, or – perish the thought – actually cross-connecting the wires… can cause hot spots, sparking, melting, and/or fire. I’m not saying you’re likely to mess it up, but it’s a high risk project if you have never been trained properly to work with electrical wiring.)
Want to spruce up a door or a wall? Paint away.
Want to spruce up something connected to electricity? Call an electrician.
(No, I’m not an electrician, nor do I have any family members who are. I’ve just seen so many botched electrical projects that I thought I’d throw my 2 volts in.)
Home centers/hardware stores frequently offer free or low-cost short courses in how to install ceiling fans and other do-it-yourself projects. My husband also took a one semester night course in residential electricity several years ago. It’s paid for itself many times over in the work he’s been able to do on our nearly 50 year old house.
I tried replying to this earlier but the server would boot me. Here’s a new try:
Yes, electricity has its dangers, and at times you need a pro (as with anything), but April’s project was to simply disconnect, clean/paint, and reconnect the fans. It wasn’t rocket science. If you’re smart enough to operate a computer you’re smart enough to study up in advance and carry out a simple repair like this.
Any kind of work will have its inherent risks. Even painting a door is not without dangers: ruined doors, damaged locks (I’ve seen them), ruined carpets from spills/splashes, suffocation by thinner fumes, thinners on fire, asthma attacks, etc.
I mean, anything can happen without safety precautions–fried eggs can turn into a grease fire, chopping onions can lose you a finger, etc. etc.
Writing from an English point of view we have domestic 230V ac not 110V ac, it stings more!
I am a time served electrical craftsman and research technician, with plenty of years of experience and courses.
If you are going to mess with electrics buy the right tools, well fitting screwdrivers and sharp cutters etc.
Loose connections cause fire as they can get hot and arc and burn (less likely with 110v).
But you easily burn your car out at 12v by bodging so take care not short cuts.
Be careful use guides on the net,
But it is well worth doing work on your home and car as many of us would have to do without if we didn’t do.
Since I have to make home changes on a budget, I have taken on several projects on a dime. Of course painting is the best way to change the look without investing alot of money.
1) I have painted the cabinet knobs silver(gold was very dated)
2) Painted on our vinyl flooring in our bathroom. It was easy. We had white vinyl that looked like little tiles so I spongepainted them with a water based paint to look like stone. Then sealed the floor. Did over 2 years ago and still looks wonderful.
3)took some of the doors off the kitchen cabinets to give that open display feel.
4) Created our own canvas art to hang on walls.
5) found counter height chairs at thrift store and reupholstered cushions and spray painted chair with glossy paint.(turned out beautiful.$20.00 total
6) Made a wine rack using an old nightstand,pvc pipe and an old display case that I found at the thrift store. Only spent 25.00 on it and sold on Craigslist for $80.00!
As you can see, this is my type of article! Haven’t touched my chandelier but now I am ready to. Thanks for sharing!
Nice article, inspiring for sure! Little quirk of mine – it’s actually a $56 ceiling fan – you got a gift card, but not everyone would!
First, you can also buy new blades relatively inexpensively. Lighting stores or the internet are good resources. In my experience, selection of replacement parts is scant at the big box stores, as they’d prefer to sell you a new fan.
There a couple of tricks to painting blades that make a successful outcome possible. Remove blades and clean them thoroughly with something like TSP. Make sure to clean both sides and the edges. Unless the finish is very shiny, don’t sand. If you must, use extra fine sandpaper and sand by hand with a very light touch.
Arrange your clean, dry blades on a large sheet of plastic or cardboard that has been secured to the ground with tape, so a random breeze won’t ruin your work. Place the blades a few inches above your protective surface. Empty cans are a good tool. Raising the blades off the ground makes it easier to paint the edges. Make sure each blade is level and evenly balanced. Allow about 12″ between blades for air circulation.
Spray paint (don’t brush) the blades in your new favorite color using extremely thin coats. Don’t point the sprayer directly at the edges, which can cause drips, just mist over them as you do the flat sides. For dark to light transformations, it could take three or four very light coats, so make sure you have plenty of paint on hand. It’s easier to return excess than to make a second trip.
Be sure to let paint dry completely between coats. What you want to avoid at all costs are drips and uneven paint coverage, as these will affect the balance of the fan. Once you’re satisfied, re-attach blades securely and re-hang.
Our latest DIY project? Installing LED’s in nearly every light fixture. Sounds easy, but the new house has 104 cans and 14 foot ceilings. Something you don’t necessarily think about when buying a house, until you get your first astronomical electricity bill. Our last bill was $100 lower, so at this rate, we’ll in the black by next year, ugh!
I absolutely love projects like this. My initial resolution to everything is to “just paint it” before I consider replacing something of good quality that is in working order. I bought an older home with “good bones” and have completed many “just paint it” projects. I am most proud of the stainless steel paint on my “Brady Bunch” double ovens. They just don’t make them like that anymore, and I hate wasting money on replacing items just for esthetics, to only purchase something of lesser quality. Nice job on the fans!!!!
You are definitely going to get rich slowly using incandescent bulbs.
I’ve only ever rented homes, so I don’t know the freedoms (and agonies) of doing real home improvements.
However, every time I’m in a new space I put up a curtain rod and make new curtains. It’s such an easy way to personalize a room!
I also once found an ugly antique parlor table and stools, and I repainted the whole set and reupholstered the stools. Looks awesome now! Plus, I kept the paint I used and have re-painted things (like kitchen shelves) to match. Kitchy but cute!
Awesome job! The metallic paint really seems to have come out great! We need to do this with a couple of our fans to make them match the room a little better.
It’s good to be reminded that style doesn’t have to come with a huge price tag!
Not a $6 makeover… how do you magically ignore the value of the gift card?
Exactly. I pinned this, but I had to change the title to reflect actual cost. Although in the end, it might’ve only cost her $6, for anyone who might hope to follow this guide, it’s going to cost quite a bit more.
Looks fabulous. Congratulations!!
$6 job…Not Really…your time is Not worth $0??
I really like how the project turned out…good job!
However, lets be more clear about what were the “actual costs” of what was done here: materials, labor and tools. This is a project for the intermediate handyperson. Your time is not $0/hr although you might not have put thought to this before. This is easily anywhere from a $35 to $75 per hr job, and I’m not even going to count what a professional like an electrician would charge…it would be more. That being said, you are looking at having “saved” yourself over $100-$200 per fan seeing as it would take about 3 hrs for this project…getting ladder, tools, disassembly, cleaning fan, prep, painting, reassembly and install to ceiling again!
is there a certain size light I would need to buy to replace the existing ones? or can I just go to home depot / lowes and tell them I need to replace the light?
I like the light kit you found at Lowes. I looked on line at Lowes and Home Depot but I can’t find it. Do you have any more information on it please? Thanks
To be fair, the labor time/cost of taking the fan down, wiring, etc… would have been the same as replacing the fan. You would need to assemble the new fan, etc… There is time involved in that too. Really the only time difference is disassembling, cleaning and painting the old parts.
She noted that her home is a hobby. A hobby is something you do in your spare time, or something you enjoy spending time doing. As with pretty much every hobby, you could pay someone else to do it, but you don’t get enjoyment out of handing someone else money.
Unless you are working 24x7x365 (and nobody does that,) there is time in every day where you are making $0. The idea that every minute of time is worth a dollar amount is stupid. Even if you want to figure “labor costs,” since she did the labor herself, she can pay herself $75/hour and still come out at $6.
At the end of the day, she now has a fan she loves and total capital outlay (for her) is $6. That was her “actual cost.” That’s thrift and smart. If you want to pay someone to do this for you, go right ahead, it’s your money.
Great look! Where did you get the light replacement. I am looking to do the same thing as you. Thanks in advance